Portal Wants Both Sides of Your ID in One File? Join Them Into a Single Image
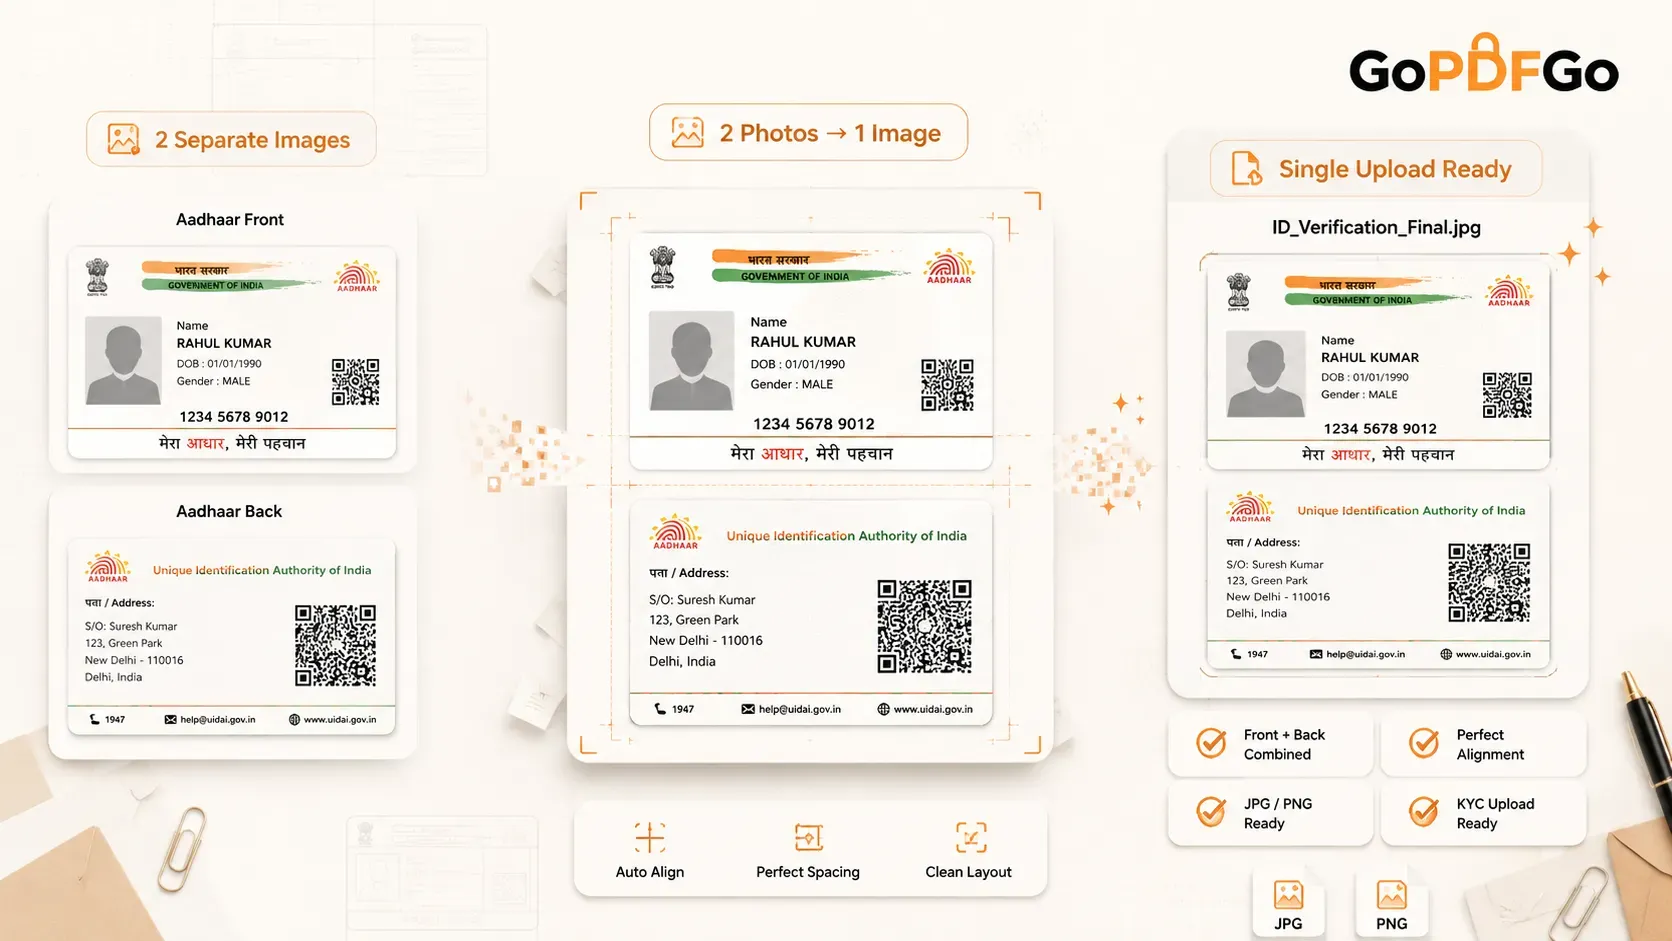
You have both sides of the card photographed and sitting in your gallery. The front with your photo and name, the back with the address and the QR square. The form on screen says Upload ID Proof and gives you exactly one box. One box, two photos. There is no second slot, no "add another file" link, and the last date is tonight.
This happens with nearly every ID that matters in India. Aadhaar, PAN, voter ID, driving licence, a cancelled cheque where the office wants the printed face and the signed back. Rent agreements, new SIM applications, bank KYC, hostel admission, gas connection transfer, a marketplace seller account, a scholarship portal — all of them want the whole document, and many of them hand you a single upload slot to put it in.
The fix is to join the two photos into one file before you upload. But there is a fork in the road that decides everything about how you do it: does the form want one image or one PDF? Get that right first and the rest takes about a minute on a phone. This guide covers both halves — how to tell which one the form is asking for, and then how to produce the image properly if that is the answer.
Read the Accepted Formats Line Before You Do Anything
Almost every upload box has a line of small grey text under it or beside it. It usually reads something like "Upload JPG/JPEG/PNG, max 200KB" or "PDF only, max 1MB". That one line is the whole instruction, and most people scroll straight past it and then wonder why the portal keeps refusing a perfectly good file.
Here is how to read it:
- It lists JPG, JPEG, PNG or "image": the form wants a picture. You need the two photos joined into a single image file. That is what the rest of this article is about.
- It lists PDF: the form wants a document. Joining the photos into a JPG will not help you here — the portal will reject the file type. You need to put both photos into a PDF instead.
- It lists both: either will be accepted, so pick whichever is easier. For a two-sided card, a single image is usually the simpler path and the lighter file.
- It says nothing at all: check the instructions page or the official notification the portal links to. That document almost always spells out the format and the size limit even when the upload page does not.
If the answer is PDF, stop reading here and go to our Image to PDF tool, which puts each photo on its own page. Our guide on combining photos into one PDF from a phone walks through that side of the job in detail, including reordering pages and keeping the file small.
If the answer is an image, carry on. You are in the right place.
Why Not Just Send Both Photos Separately?
Because usually you physically cannot. A single upload input takes one file, and choosing a second photo replaces the first rather than adding to it. People try all sorts of workarounds at this point — uploading the front and emailing the back afterwards, or pasting both into a document and screenshotting it, or worse, holding both sides of the card in one hand and taking a single wide photo where neither side is readable.
Even when a form does let you send two files, one image is still the better answer. Files get separated. The verifier downloads one, forgets the second is in a follow-up email, and your application sits in a pending queue while somebody waits for a document you already sent. One file with both sides in it removes that entire failure mode.
What you want is a single picture with the front on top and the back below it, at a readable size, in a format the form accepts. That is exactly the job the Combine Images tool does — and nothing else, which is why it is quick.
Order Matters: Front First, Always
Whoever opens your file expects to see the front of the card first. It carries the photo, the name and the number, which is what they are matching against your form. The back is supporting detail. If you hand them a file where the address side appears first, nothing breaks, but it reads as careless — and at a verification desk, careless is the impression you least want to make.
Because you place the photos yourself, getting this right is just a matter of where you drag them: drop the front onto the top of the page and the back below it. The photos you add also show up in a short list beside the page, each with a thumbnail and a remove button, plus an Add more photos button if a third one belongs in there — the back of a cheque, say, or a second address proof.
Do the check before you download, not after. Look at the page, confirm the side with your photograph is on top, and only then save the file.
Arranging the Two Sides on the Page
The tool gives you a blank A4 page and lets you decide how the two photos sit on it. There is no fixed template — you drag each photo where you want it and size it to taste, the same way you would lay two printouts on a desk before scanning them.
Two controls do all the work:
- Drag to move. Press a photo and slide it anywhere on the page. Put the front near the top and the back below it, and leave as much or as little space between them as you like — a small gap reads best for an ID, because it makes the two sides obviously separate rather than looking like one long card.
- Drag the corner to resize. Each photo has a small orange handle at its bottom-right. Pull it to make that photo bigger or smaller. The photo keeps its proportions the whole time, so nothing is ever stretched or squashed — you are only changing its size on the page. If one shot was taken closer than the other and looks larger, shrink it until the two match.
Then pick the page shape to suit your photos. Portrait is a tall A4 and is the right default for ID cards, which are wide and short — two of them sit naturally one above the other. Landscape is a wide A4 and suits tall photos, like a long certificate or two passbook pages, placed next to each other. The page itself is plain white, like a sheet of paper, so the finished file looks like a proper scan rather than a collage.
JPG or PNG for the Output?
The tool saves as either, and the difference matters more than people assume when there is a size limit involved.
- JPG gives you the smaller file. This is what you want for almost every upload form, because forms have size caps and JPG is the format they most commonly ask for. One thing to know: JPG cannot store transparency, so the canvas is filled with white before your photos are drawn. If either photo has a see-through background, that area comes out white rather than black or broken.
- PNG is lossless and keeps transparency. Pick it when the card carries small printed text you want kept as crisp as possible, or when one of your images genuinely has a transparent background you need preserved. The trade-off is a noticeably heavier file.
If you are undecided, go with JPG and only switch to PNG if the text in the result looks soft when you zoom in. The short version of the rule: JPG for anything photographic and anything headed to an upload form, PNG when clean edges and small printed text matter more to you than file size.
How to Put the Front and Back of Your ID in One Image
- Step 1: Photograph both sides of the card in good light, straight down, with the flash off. Fill the frame with the card so you are not capturing half your table. Daylight near a window beats a tubelight overhead every time.
- Step 2: Open the Combine Images tool in your phone or laptop browser. Nothing to install, no account to make.
- Step 3: Add both photos. They drop onto a blank A4 page — drag the front to the top and the back below it. Remove anything you picked by mistake, and use Add more photos if a third image belongs on the page.
- Step 4: Size each photo by dragging its orange corner handle, and leave a little space between the two so they read as separate sides. Pick Portrait for a normal card or Landscape if both photos are tall.
- Step 5: Pick your output format — JPG for the smaller file that most forms want, PNG for the sharpest text — and download your A4 page as one image.
- Step 6: Before you send it anywhere, mask the ID number. Details on that in the next section, and it is the step people skip.
The Safety Step Almost Everyone Forgets
You now have one clean image with both sides of your Aadhaar in it, which is convenient for you and also extremely convenient for anyone who ends up with a copy. A joined file is a more complete package than a single side — front and back, photo, address and number, all in one download.
Unless the office genuinely needs your full number, mask it before you share. Open the combined image in our Aadhaar Masking tool and draw a solid black box over the first 8 digits, leaving the last 4 visible so the copy is still verifiable. The masking is flattened into the image itself, so there is no layer anyone can click and delete to reveal what is underneath.
Cover the QR code as well. The square QR printed on an Aadhaar can still carry your full details even after the printed number is hidden, so blacking out the digits and leaving a scannable QR can defeat the whole exercise — and the QR usually sits on the back, which is the half people forget to look at. Our full walkthrough on masking an Aadhaar safely for rent agreements and KYC covers when a masked copy is enough and when it is not.
The same logic applies to a cheque leaf. If you are joining both sides of a cheque for a bank mandate, look at what is visible in the finished image before you send it, and black out anything the recipient has no business having.
When the Combined File Is Too Big
An A4 page saved as an image is a fixed, fairly large size, so the file can be heavier than a single phone photo. If the portal caps uploads at a specific KB figure and your page lands over it, you have one more step to do rather than a problem.
Save as JPG rather than PNG, then run the file through Compress JPG and set the exact limit the form asks for. Do the compression last, after joining and after masking, so you are only shrinking once. If you compress each photo first and then join them, you have squeezed the quality twice for no reason. Our guide on getting a JPG under 20KB for online forms goes through the tighter limits that exam portals tend to set.
One more thing worth knowing: the page is saved at a fixed A4 size — 1240 by 1754 pixels — whatever you put on it. That keeps the file predictable and is plenty of resolution to read an ID clearly, but it is why the result comes back at a set size rather than matching the dimensions of your original photos.
Things That Go Wrong, and the Quick Fixes
- The result came out sideways. Phone photos carry an orientation tag and the tool reads it, so an upright photo stays upright. If a picture was genuinely saved rotated, fix it with the Rotate Image tool first — rotating there writes the change into the file, so it comes in the right way up.
- One side looks much bigger than the other. You set the sizes here, so drag the smaller photo's corner handle until the two match. Nothing is resized automatically.
- There is a lot of table and thumb around the card. Trim each photo with Crop before you combine. A tighter crop also means fewer wasted pixels, which helps with the size limit.
- The background behind the photos is white, not transparent. The page is a sheet of white paper on purpose, so the space around your photos is white in both JPG and PNG. If you want a photo with no page around it, crop that photo rather than placing it on a page.
- The form wants a specific pixel size. Combining does not let you dial in exact dimensions. Get the joined image first, then set the width and height you need with the Resize Image tool.
- The form actually wanted a PDF. Go back to Image to PDF and feed it the two photos directly. You do not need to combine them into one image first.
Everything Stays on Your Device
This matters more here than on almost any other tool, because of what people are joining. Aadhaar cards, PAN cards, cheques, passbooks, driving licences. If you search for a free tool to merge two photos, many of the results will upload your ID to a server you have never heard of, in a country you did not choose, and hand it back afterwards. The file is joined, and a copy of your unmasked ID now exists somewhere you cannot reach.
Combine Images does the joining inside your own browser. Your phone or laptop draws both photos onto one canvas and gives you the result. Nothing is uploaded, there is no account, and there is no watermark stamped across the corner. It also means it keeps working on a weak connection, because once the page has loaded the work happens on the device in your hand.
Frequently Asked Questions
Q: How do I put the front and back of my Aadhaar in one image?
A: Open the Combine Images tool, add both photos, drag the front to the top of the page and the back below it, resize each so they fit neatly with a little space between, and download. That gives you one image file with both sides, which is what a single upload box needs. Mask the first 8 digits and the QR code with Aadhaar Masking before you send it.
Q: Does this create a PDF?
A: No. It produces one image — JPG or PNG — which is what most upload boxes ask for. If the form specifically wants a PDF, use Image to PDF instead, which puts your photos on proper pages.
Q: How do I know whether the form wants an image or a PDF?
A: Read the accepted-formats line next to the upload box. If it lists JPG, JPEG or PNG, it wants an image. If it lists PDF, it wants a PDF. If nothing is written on the upload page, check the instructions page or the official notification, which almost always states the format and the size limit.
Q: Should the front or the back come first?
A: Front first. The side with your photo, name and number is what a verifier matches against your application; the address side is supporting detail. Drag the front photo to the top of the page before you download.
Q: Can I combine more than two photos?
A: Yes. Add as many as you need and arrange them all on the same page. Bear in mind that a crowded page gets cramped; for several photos, Landscape usually gives you more room.
Q: Are my ID photos uploaded to a server?
A: No. The joining happens inside your own browser and the finished image is handed straight back to you. Nothing about the photos leaves your device, which is the entire reason to do this here rather than on a site that wants your Aadhaar on its servers.